Project Development 📝👷🏻♂️
- Fiona Ling
- Feb 26, 2025
- 19 min read

If you are using biomass for cooking, this device will make your life easier :)
🌠Welcome to my last blog for this module
After almost a semester, we finally created our very own prototype, using all the technical skills and hands on experience into this one project.
Join me as I unveil the entire journey of building this prototype. We'll explore the triumphs and challenges we faced along the way. My hope is that this experience will ignite your passion and inspire you to bring your own ideas to life!💖
Chapter 1.0 Our Chemical Device
We were asked to choose a project that incorporated the knowledge we gained from ICPD and CPDD. Our objective was to create and construct a chemical device to demonstrate a specific functionality.
Furthermore, we were required to utilize skills like 3D Modelling and Printing, Arduino Programming, and incorporate at least one mechanism such as gears, levers, or springs.
When I got the project details, it seemed really challenging, and we were given a maximum of 4 weeks to develop our prototype! If we succeed, it will be our first chemical device prototype.
How exciting!!!🎉🎉
Okay, let's start the real thing!
Four choices were available❗
Option A: Disinfecting Device
Option B: Tea Brewer
Option C: Half-Boiled Egg Maker
Option D: CO Monitoring System
✨TADA! The chosen one will be Option D ✨
I am very motivated to make sure our work on this prototype is successful. Out of all the options, I am especially interested in the CO monitoring system, which I like to call the Gas Detector.
One reason I find this project exciting is that it can help with safety and health. By creating a good gas detection system, we can help prevent dangerous situations and save lives. This purpose makes me really excited about the project.
Most importantly, it's because I don't like smoky areas. So, if you see me running away from a smoky area, just know I'm not being dramatic... 😷🏃♂️
So you may or may not know, but a significant number of people continue to suffer from the exhaust gases emitted during biomass cooking. 🔥😢
Hence, we did some research to support our problem statement ⬇️
‼️ Health Consequences: Exposure to toxic fumes can cause respiratory issues, headaches, and long-term lung damage. These health risks are particularly concerning for vulnerable populations, including children 👶 and the elderly 👵, who may experience exacerbated symptoms and complications.

‼️ Environmental Impact: Biomass burning releases harmful gases 🌫️, worsening air pollution and contributing to climate change 🌍. The release of these pollutants not only affects local air quality but also has far-reaching effects on global climate patterns, making it a significant environmental concern.

These statistics indicate that this issue is harming people's health, particularly since all these deaths are preventable. 🚨💔
Therefore, after identifying the problem that we want to solve, we went through a complete design thinking process to develop the final gas detector and its functionality.
Let's start of with a seek peak our initial raw sketch of our chemical device 💖

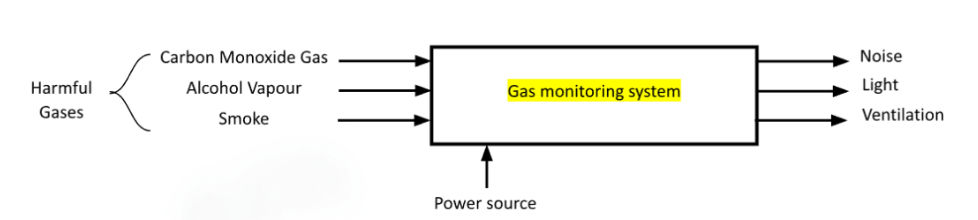
So how does our little box works?
A dangerous gas is identified and evaluated against a Set Point (SP).
When the gas concentration, referred to as the Process Variable (PV), exceeds the SP (PV>SP), the MQ2 Smoke Sensor (Transmitter) transmits a signal to the Arduino Board (Controller).
The controller activates the Exhaust Fan (acting like a control valve) until the PV falls below the SP.
A sound and light alarm will also be triggered when PV>SP, warning us that the levels of harmful gases are hazardous.
So how does our product help to resolve the problem?

Gas Detector
Our product uses an MQ2 smoke sensor, known for its wide range of detectable gases, to monitor air quality and detect harmful gases.

Exhaust Fan
Removes polluted air from the indoor space, improving ventilation.

Sound Alarm & LED Warning Lights
Features a high-pitched electronic buzzer to ensure everyone hears the alert, accompanied by a bright LED for a visual warning.

Activated Carbon Filter
Uses activated carbon filtration to absorb harmful pollutants and odors, ensuring that the exhausted air is as safe as possible.
That's not our final prototype yet! 🚧
This is just a preview of what our project is about to ensure that I am making myself clear about what we are doing. 🛠️ I will delve into the details of the design and building process to achieve our final prototype in the next part. 😊
Chapter 2.0 Team Roles, Planning & Execution 🚀
The DREAM 🌟 team
: 🎀 𝒯𝒽𝑒 𝒢𝒶𝓈 𝐵𝓊𝓈𝓉𝑒𝓇𝓈 🎀 :

We came up with this name while working on our presentation slides. The primary goal for the team name is to grab people's attention and instantly convey what we are doing. And just like that, BOOM 💥, the name was born.
Oh, and the logo was created by Yoong Sern 🎨. He's a very engineering guy ⚙️, but trying to have a side hustle in designing as well 💼. He always gave me surprises, I swear! 🎉
Oops, I got sidetracked... The name was inspired by Ghostbusters 👻. Instead of capturing ghosts, we're capturing exhaust gas 🍳💨. Thus, we named our prototype Trap 🕸️.
Okay so why is this a dream team of mine? Everyone is good at different things and when we come together as one, things just get interesting!
Let's start with Rakshan - our Chief Executive Officer (CEO) 👔. He oversees the whole process of designing and building of our prototype 🛠️. His strength is in the theoretical part of things, smart guy 🧠. Therefore, he will host all our discussions and meetings 📅 to ensure we remain aligned and do not overlook any necessary aspects 🔍.
Following that is me, the Chief Financial Officer (CFO). I oversee the finances in line with the Bill of Materials (BOM) 📜 and ensure we adhere to the budget. I am also responsible for purchasing materials 🛍️. During the building process, I am quite handy, so I ensured Trap looks adorable ✨ and that the dimensions were accurate 📏. I also have a second role to make sure we are focused. Tell me how can 3 guys can be distracted by different things at the same time......
Next is Muhsin the Chief Security Officer (CSO). He ensures that we operate safely in line with the Risk Assessment ✅. Throughout the construction phase, he was responsible for programming 📟 and establishing the Arduino and Breadboard connections 🔌.
Lastly will be Yoong Sern, Chief Operating Officer (COO). 🔧 He manages the precise schedule for developing the prototype, particularly since 3D printing can be time-consuming with multiple failed attempts ⏳. During the construction phase, he was in charge of putting together the parts of Trap 🛠️, conducting the primary 3D modeling 💻, and assisting with the cutting and folding of cardboard 📏📦.
Let's get thing starting‼️
Here's our BOM (Bill of Material) 📋

Each group was allocated $100 for the entire prototype, which covered the cost of materials, including the Arduino board we acquired a few months back 😭. Fortunately, our group stayed within budget 🎉 YIPEEEE! However, we did purchase items that ultimately went unused—the extra gas detector and 5V fan. As it was our first experience with these electronic devices, we were concerned about handling them properly, so we bought extras as a precaution. 🤖
That was unexpected....🥺
Our Gantt Chart ⏳

Legend:
Yellow: The tasks that need to be done
Grey: When the tasks were actually done
A Gantt chart is a project management tool 📊 that illustrates a project's schedule, tasks, and team members' responsibilities visually 👥. It helps in tracking progress, allocating tasks, and adhering to deadlines ⏰ by displaying activities as bars on a timeline 📅.
As you can see, we were very punctual! ⏰ We used all the time allocated for our CPDD classes, trying to be more productive 💪 so we can have more time for other assignments and revision as well.
From the Gantt Chart 📊, it can be observed that we did most of the tasks together, but for different parts, we have different members taking charge of them. For example, Muhsin is in charge of the coding 💻, Yoong Sern is in charge of the 3D printing 🖨️, Rakshan is responsible for the presentation slides 📑 and discussion 🗣️, while I am in charge of the sketching, modeling 🏗️ and finance 💰.
I would say we did manage to follow this plan where everyone was involved, except for coding. We tried to understand it, but it's just too tough 😅. Muhsin is really handling it, and we really appreciate his work 🙌. With our teamwork 🤝, it was a very productive and fun project to work on 🎉.
Chapter 3.0 Design & Build Process
𝔗𝔥𝔦𝔰 𝔦𝔰 𝔞 𝔰𝔱𝔬𝔯𝔶 𝔬𝔣 𝔥𝔬𝔴 𝔱𝔥𝔢 𝔗𝔯𝔞𝔭 𝔱𝔥𝔢 𝔠𝔥𝔦𝔠𝔨𝔢𝔫 𝔟𝔢𝔠𝔬𝔪𝔢 𝔱𝔬 𝔩𝔦𝔣𝔢
The start of the story - Design Process
What was the process and reasoning that led to the final design? It involved a lot of brainstorming and discussions.....
We first start of with a discussion of "What do we want our user to experience when using our product?". Hence, we figured out the requirements, and came up with our function diagram.

For the visualization of the prototype, I was the one in charge of the design. At first, we were really taking divergent thinking seriously. The number of crazy and fun ideas that we created can be seen in the drawings below.

With so many different concept, we used the concept evaluation matrix (Figure 8) to help us evaluate the best design that will meet our objectives.
We really have the urge to create concept two with the pipe organ but we held back and just being realistic. I wonder how will it look like hmmmm....

Ultimately, we decided on concept one.
With concept 1, we create the design specification table. The most important part related to how our prototype works will be the detection range of the gas detector.
The detection range is 300 - 10,000 ppm. To achieve the safety purpose of this product, the alarm will be activated at 1,000 ppm. The frequency of the alarm rings differs with the range of the reading as well. The higher the reading, the more the frequency of the alarm increases.

✦ . ⁺ . ✦ . ⁺ . ✦
The mechanism used - Latch and a spring
One of the prototype criteria was to include a moving mechanism that we learned before, examples like levers and gears. So when we were cracking our heads 🤔 trying to think of a mechanism that we could use for the opening of the top compartment, we tried several ideas, but the position just felt awkward. Then, I was drinking water from my thermos flask 🚰, and suddenly the cap opening mechanism caught my attention. Just BAM 💡, "Yoong Sern, I think we can use this one." How crazy was that? 🤯
This is the thermos that I'm talking about,
yup the miracle starts from drinking water.
Drink water guys, the weather is hot 💗
Here's what it gonna look like🔥
I will show more in the next 3D printing part!

✦ . ⁺ . ✦ . ⁺ . ✦
Here's a short vlog from me about our first day of working on our prototype 🎥✨
3D Printing 🖨️

We first started of the building part with 3D printing. It started off with the thoughts of laser cutting the walls for the prototype, then glue them together with silicon glue. However, we were not able to book for the laser cut machine, so we decided to use cardboard for most of the parts 😥 But look at the bright side, we managed to cut down the budget as well.
So, in the end, we just need to 3D print 2 things
the latch
the base for the Arduino and hinge for the cover
Although we already had a sketch of our design, we still think doing the 3D sketch with Fusion would be much more accurate and easier to measure the parts that we need for 3D printing. 🖌️🖥️
Thanks to Yoong Sern, this is our initial design ⬇️
(1) The base for the Arduino and hinge for the cover


Explanation on the design:
The vertical wall is where the opening of the top compartment is 🏢. The hole allows the gas detector to be exposed, ensuring it faces the room for air contact. 🌬️
The base houses the Arduino and the breadboard. 💻 The hole in the base allows the fan's wires to pass through from the bottom compartment. 🔌
⋅•⋅⊰∙∘☽༓☾∘∙⊱⋅•⋅
(2) The latch
The latch system is fixed to the top of Trap 🏗️ to ensure everything remains secure. 🔐
Yoong Sern's design is incredible! 🎨✨ We nailed it on our first attempt! 💪🚀
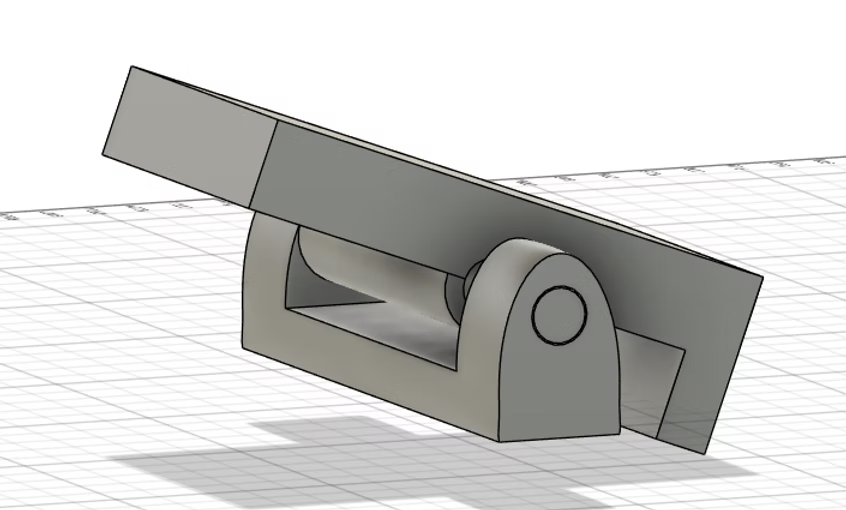

When you press down on the lever, the other side rises and releases the door

There is also a second mechanism, which is the spring 🌱. It ensures that the latch remains fixed in the closed position 🔒. Therefore, the cover will only open when we press down the spring 🔘.
In the image to the right, the latch is oriented downward, indicating it is always in the closed position.
˚₊‧꒰ა . ——— ˗ˏˋ ✮ ˎˊ˗ ——— ˖ ໒꒱ ‧₊˚
Coding the Arduino💻
This is Muhsin's area of expertise, yet I still found it very challenging to grasp. 🤔 I'm amazed at how he manages to accomplish all this just by researching online and getting help from ChatGPT. 💻✨
How does our code work?
When the gas detector has a reading above 1000ppm, it will activate the alarm on the Arduino, the LED light bulb and the fan. With this the fan can ventilate the harmful gas automatically.
With the data sheet provided by the seller, Muhsin first calibrate the gas detector reading and display it on the LED screen. So he first used clean air to verify the reading under normal circumstances. He tried using the hair dryer and also the exhaust air from the air purifier.

Initially, the problem he encountered was that the LED screen could only show "High" or "Low." He then applied the linear regression we had previously studied to transform the raw data from the MQ2 smoke sensor into a suitable concentration (ppm) value, which was then displayed on the LED screen.
✨BIG BRAIN MOMENT✨
The code is super long. Try it if your're interested!
The Code |
#include <LiquidCrystal_I2C.h> #include <Wire.h> // Pin Definitions const int gasSensorPin = A0; const int ledPin = 5; const int buzzerPin = 8; const int fanPin = 7; // Pin for the fan // Sensor Constants const float RL = 10000.0; // Load resistance (Ω) float freshAirRatio = 1.52; // LPG Sensor Calibration (from sensor datasheet) // (Replace with values from your sensor's datasheet) const float m = -0.473; const float b = 1.413; // Threshold for alert (PPM) const float gasThresholdPPM = 1000.0; // Variables float gasPPM; int gasValue; float R0; // LCD Setup LiquidCrystal_I2C lcd(0x27, 16, 2); void setup() { pinMode(ledPin, OUTPUT); pinMode(buzzerPin, OUTPUT); pinMode(fanPin, OUTPUT); // Set fan pin as output Serial.begin(9600); lcd.init(); lcd.backlight(); lcd.clear(); // Calibrate R0 in clean air R0 = calculateR0(); Serial.print("Calibrated R0: "); Serial.println(R0); Serial.println("Calibration Complete. Monitoring Gas Levels."); } void loop() { const int numReadings = 10; // Number of readings to average float total = 0; float sensorResistance; float ratio; // Take multiple readings for stability for (int i = 0; i < numReadings; i++) { gasValue = analogRead(gasSensorPin); if (gasValue > 1023) gasValue = 1023; sensorResistance = ((1023.0 / gasValue) - 1) * RL; ratio = sensorResistance / R0; total += pow(10, (log10(ratio) - b) / m); delay(50); } gasPPM = total / numReadings; // Debug prints Serial.print("Raw Analog: "); Serial.println(gasValue); Serial.print("Calculated PPM: "); Serial.println(gasPPM); // Update LCD display lcd.clear(); lcd.setCursor(0, 0); lcd.print("Conc: "); lcd.print(gasPPM); lcd.print(" PPM"); if (gasPPM > gasThresholdPPM) { lcd.setCursor(0, 1); lcd.print("Status: HIGH!"); digitalWrite(fanPin, HIGH); // For high gas concentrations, run the alarm routine repeatedly for 1 second unsigned long alarmStart = millis(); while (millis() - alarmStart < 1000) { triggerAlarm(gasPPM); } } else { lcd.setCursor(0, 1); lcd.print("Status: Normal"); digitalWrite(fanPin, LOW); blinkLED(); delay(1000); } } /* * triggerAlarm() produces a beep on the buzzer and a flash on the LED. * The on-time is fixed at 50ms. The off-time is mapped from 200ms (at 1,000 PPM) * down to 50ms (at 5,000 PPM), so the beep rate increases as gas concentration rises. */ void triggerAlarm(float concentration) { const float maxConcentration = 5000.0;
int onTime = 50; // beep on-time in ms // Map concentration to offTime: at gasThresholdPPM (1000 PPM) offTime ~200ms, at maxConcentration offTime ~50ms. int offTime = map(concentration, gasThresholdPPM, maxConcentration, 200, 50); offTime = constrain(offTime, 50, 200); // Activate buzzer and LED together for the beep tone(buzzerPin, 1000); // 1kHz tone digitalWrite(ledPin, HIGH); delay(onTime); noTone(buzzerPin); digitalWrite(ledPin, LOW); delay(offTime); } /* * blinkLED() is used when gas concentration is normal. * It makes the LED blink slowly (1 second on, 1 second off). */ void blinkLED() { digitalWrite(ledPin, HIGH); delay(1000); digitalWrite(ledPin, LOW); delay(1000); } /* * calculateR0() calibrates the sensor in clean air. * It reads the sensor several times and calculates the baseline resistance R0. */ float calculateR0() { float sumRs = 0; int samples = 50; float sensorResistance; Serial.println("Calibrating R0 (Clean Air)..."); for (int i = 0; i < samples; i++) { int sensorVal = analogRead(gasSensorPin); sensorResistance = ((1023.0 / sensorVal) - 1) * RL; sumRs += sensorResistance; delay(50); Serial.print("Sample "); Serial.print(i + 1); Serial.print(": Rs = "); Serial.println(sensorResistance); } float R0_calibrated = sumRs / (samples * freshAirRatio); Serial.print("Calibrated R0: "); Serial.println(R0_calibrated); return R0_calibrated; } |
Connecting all electric components

✧˖ °. ݁₊ ⊹ . ݁˖ . ݁‧₊˚ ☾. ݁₊ ⊹ . ݁˖ . ݁˖°✧
Cutting and folding of Cardboard 🖇️✂️
Since we already got the dimensions when creating the design in Fusion, we now cut out the cardboard according to the dimension.

From this image on the left, the top and the bottom section will be crated using cardboard.
The top part, is where the Arduino and breadboard will be. the frame at the right side is suppose for the LED display. But we chose to do it simple and just cut out a window and secure it with a blue-tag.

For the bottom part is where the fan and filter will be placed. We cut the opening according to the fan size. We created a fan stand for a easier assembly of the fan. There's also a frame for the placement of the filter, which we also focus on the easy assemble feature for our prototype.


I made both of these parts ✨
✧°˖ . ݁˖︵‿❀‿︵˖ . ݁˖°✧
Decorating the Cardboard 🎨✨
This is my favorite section - I can make some arts and crafts! 🎨✂️🖌️
And ehem this is my strength - I like cute and pretty stuff 😳🪭
So we first wrap all the visible cardboard parts with light green colored paper.


And it was on this one sunny day, suddenly I felt it looked like the Crossy Road chicken.
I successfully convinced them that it was a chicken also 🤣
So with some help from Yoong Sern to make the legs and draw wings, eye for Trap,
it become this !!! ⬇️
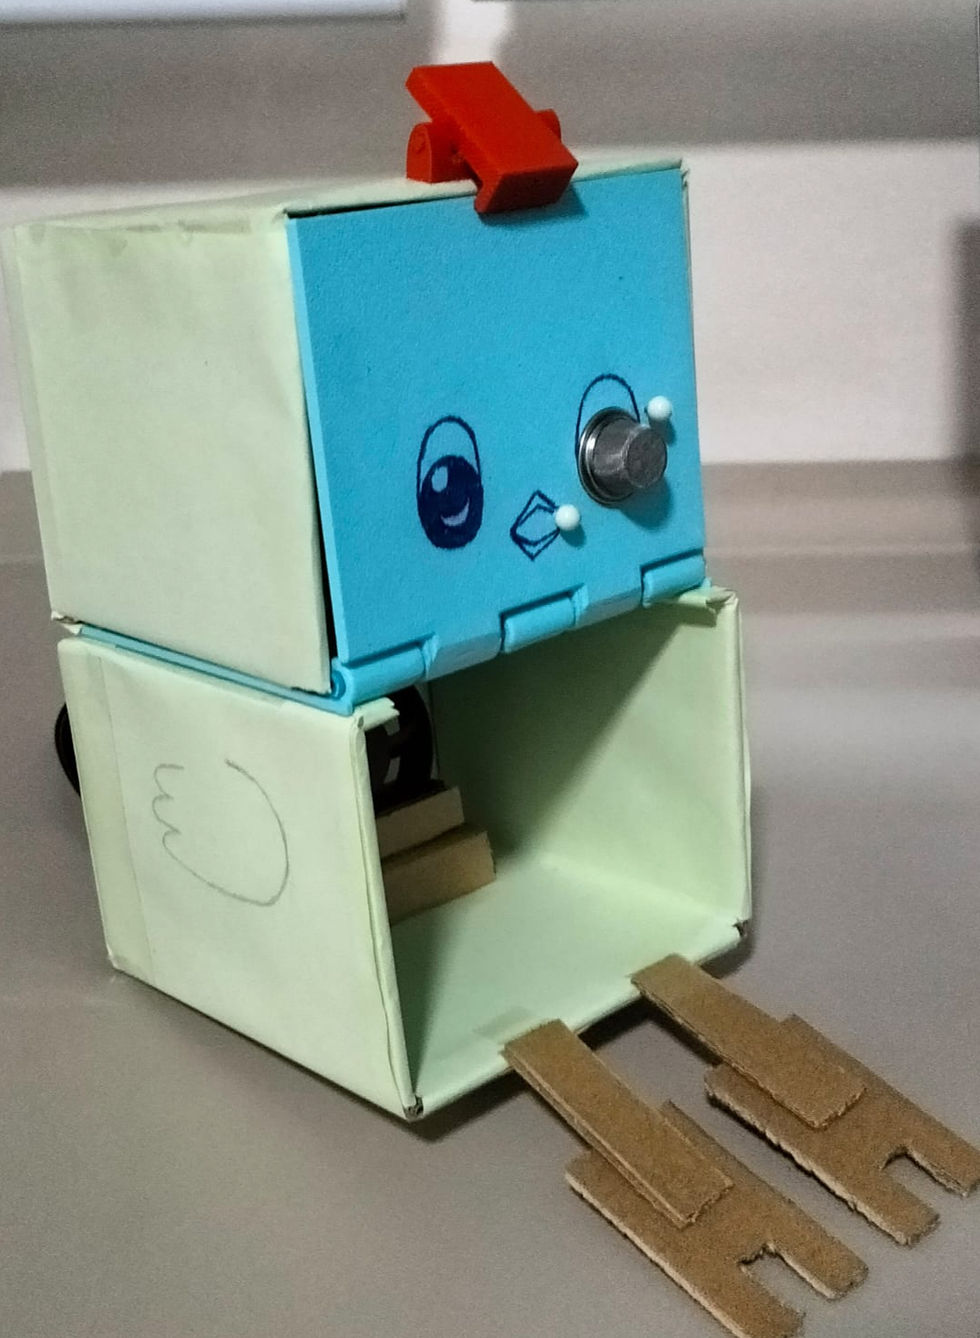
As a household item, it's important for it to have an appealing design that complements the overall aesthetic of the home, rather than appearing as just an ordinary box. By incorporating charming elements into its appearance, it can enhance the decor while serving its practical purpose.
⊹₊⋆☁︎⋆⁺⊹₊⋆☁︎⋆⁺₊⋆ ☀︎ ⋆⁺₊⋆☁︎⋆₊ ⊹₊⋆☁︎⋆₊ ⊹
Testing of the prototype💡⚡
To avoid releasing black smoke by burning materials, we opt to use an alcohol wipe for the demonstration. - Protecting the air.
Here is a video of our Gas Detector working❗
Pay attention to the alarm buzzing noise. Do you recognize the different frequency?
Our prototype was successful! 🎉 However, the journey wasn't entirely smooth. 🚧 We encountered some challenges along the way. 😅
Chapter 4.0 Problems & Solution
Big Problem: 3D printing
(1) The printing of the hinge

See the picture above, this was our first try for 3D printing. As we were not familiar to use the 3D printing machine ourselves, we missed out a few steps to check before pressing the start button. First, we forgot to check the filament amount in the machine. Our print failed after 5 mins and we needed to top up the filament. After that happened the spaghetti incident. The filament somehow just cannot stick to each other and flying all over the place.
What's the reason?
The initial layer failed to stick correctly to the print bed, resulting in the entire print becoming detached during the process.
This issue can often be attributed to improper bed leveling or inadequate adhesion methods.
How to solve it?
We started with a proper bed adhesion technique, like using a skirt, brim, or raft to ensure the first layer stuck firmly.
The story doesn't end here....
The hinge was intended to be printed in place, but we encountered difficulties in printing it successfully. The hinge fused together, making it impossible to bend. Initially, we suspected that the spacing for the rotational part was insufficient, so we increased it, but it became too loose to close properly. Due to time constraints, we decided to print the two faces separately and connect them with a rod that showed in chapter 3.0.


This scenario happens when we set the orientation of the rod to be printed vertically, which eventually failed.
What I learnt? 😗📑
The main lesson from this experience is that patience and preparation are crucial in 3D printing. Beginning a print hastily without adequate calibration and setup results in wasted time, materials, and frustration. Dedicating time to ensure proper bed adhesion, choosing the correct print orientation, and double-checking settings can prevent common failures.
Prototyping time is limited, particularly when we have to share facilities with other students. Such careless mistakes should not hinder our progress. Recognizing and resolving these problems now improves our 3D printing skills and saves costs in the future, such as during the final year project.
(2) The pegs for the gas detector cover was too weak


In considering a method to secure the gas detector, we decided to utilize 3D printing to enhance its durability. Unfortunately, the results did not meet our expectations.
As shown in the image above, the printed cover was misaligned, making it difficult to insert the pegs into the designated holes. To make matters worse, the pegs ended up breaking during this process. This setback has prompted us to explore alternative materials and techniques to ensure a more reliable design.
Instead, we inserted sturdy pins through the walls to hold the MQ2 smoke sensor in place. To ensure our product was safe, we covered the sharp ends with Blu Tack to prevent any injuries.


This straightforward but efficient approach greatly enhanced the stability and dependability of our setup!
What I learnt? 😗📑
The longevity of design plays a crucial role in ensuring that our products are sustainable and can withstand the test of time. By prioritizing durability, we not only enhance the product's lifespan but also contribute to environmental sustainability by reducing waste.
In many cases, opting for straightforward approaches can significantly save both time and effort. Simplicity often leads to more efficient processes, enabling us to focus on what truly matters without unnecessary complications.
Chapter 5.0 Project Design Files
If you want to try out the 3D prints, feel free to download the file by pressing the "Open in Fusion" button below.
Chapter 6.0 Learning Reflection
Learning point 1: One step at a time
Before we started building our prototype, I felt totally swamped! There were so many things to do, and time was short. It seemed impossible. But then, we made a Gantt chart, and it changed everything.
The chart helped us break the big project into smaller tasks. Instead of feeling overwhelmed, I could focus on one thing at a time. It was like climbing stairs, not a mountain. Seeing each task marked as done on the chart was really satisfying, too!
I learned that planning is super important. Without the Gantt chart, we would have been totally disorganized. It showed me that even big projects can be managed if you take it one step at a time. I’ll definitely use this method in future projects, especially when I feel like things are getting too much. It made everything much less stressful and helped us finish on time
Learning point 2: Embracing diverse ideas
Making this prototype taught me a big thing: everyone's ideas count, even if we're good at different stuff. At first, I thought the people who seemed to know the most had all the answers. But I was wrong!
Like, Yoong Sern was amazing at 3D printing all the parts. He made them perfectly. But that didn't mean he knew how to put all the electronics together. He didn't know how much space we'd need inside. Then Rakshan came up with the idea of putting certain electronics on different sides of the prototype to make it look way better.
It showed me that just because someone's good at one thing, it doesn't mean they know everything. We needed everyone's ideas to make it work. So, listening to everyone is super important. I'll remember this for future projects: everyone's thoughts are valuable, and we need to work together to make the best things.
Overall Experience?
I am truly grateful for this team. I would say it is a significant success and achievement in our polytechnic life. Who would have thought we could build our own working prototype in year two? However, there is still a long way to go. For instance, the coding part is challenging for us, but for students from other courses, it might be a basic skill. Similarly, when it comes to hands-on activities, like building with cardboard, we might not excel as art students do.
As a chemical engineering student, it's all about solving problems using various skills we have. To create more useful things in life, continuous learning is essential for our growth and to see things from different perspectives. We must embrace the challenges that come our way and leverage the strengths of our diverse backgrounds. By collaborating and sharing knowledge, we can overcome our weaknesses and enhance our collective abilities. This journey is not just about individual success; it is about fostering a supportive environment where each team member can thrive. As we move forward, let us remain committed to learning and innovating, ensuring that our prototype is just the beginning of our achievements in this exciting field.
Thoughts on this module?
This module gave a feeling of OSIP, where I also required to solve problems and build a prototype. To be honest, I really enjoyed it. I guess I like problem solving and being creative to come up with ideas. I am really excited. The challenges presented in this module pushed me to think outside the box and explore innovative solutions. Regarding blogging, I agree that it takes a lot of time. Nonetheless, it's an effective method to document and summarize what we learn during the module.
I'm thrilled about our final year project, particularly because I'll be collaborating with this team once more.
This is the end of my journey in CPDD. Thank you for your time reading my story.
-The End -


Comments